

How To Remove Ubuntu From Dual Boot Windows 10 Uefi
Last updated: November 27, 2021
Take yous triedinstall Ubuntu in dual-boot with Windows but without success ?
You lot practise non know the deviation betwixt the old BIOS and the new UEFI?
Practice y'all want install Ubuntu while keeping Windows to the side ?
Then yous are in the right place ![]() ...
...
... if you are using a recent version of Windows, for example : Windows viii, Windows 8.one egg Windows 10!
In this Complete tutorial You will discover :
- Comment create recovery cardinal (in case),
- Comment disable "secure kick" and fast offset,
- Annotate create a bootable Ubuntu 15.one USB drive (64bit)
- Comment create free space on your difficult bulldoze,
- Comment install Ubuntu from A to Z with a custom partition,
- Annotate customize the boot gild (UEFI & Chow ii)
Click on i of the bullets above to get direct to one of the steps easily ![]()
***
WARNING !!!!!!!! MAKE Sure to Fill-in important files and documents in external hard drive, you may lose all information on your PC. Knowing that I will explain EVERYTHING, it is Of import to KEEP your data in a safety identify !!!
***
If you lot choose to continue, information technology ways that you have already saved the sensitive data in a protected place, this tutorial is easy to follow, do not skip any steps to be sure that Ubuntu will work correctly adjacent to your Windows already installed.
Permit's go!
Dual-Boot betwixt Ubuntu 15.one and Windows 8-10.
0. UEFI bios only.
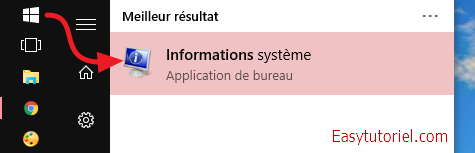
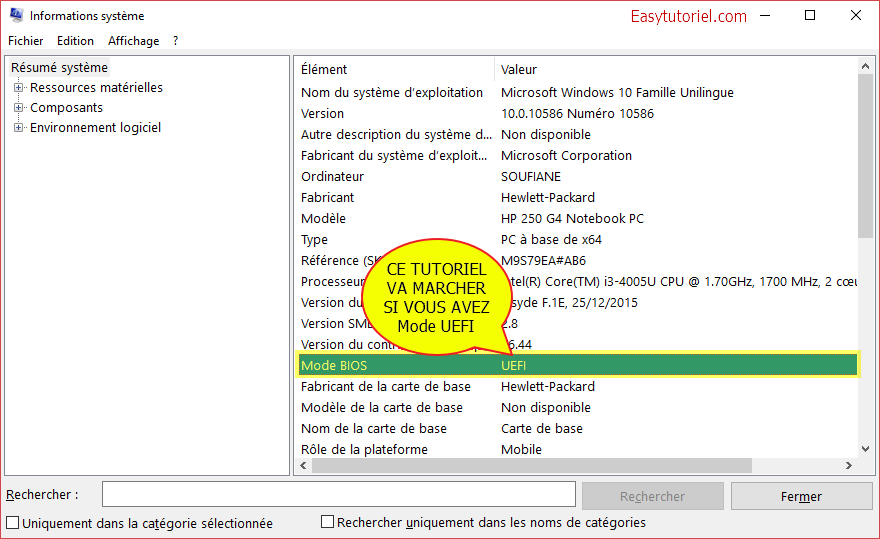
Before yous brainstorm, look for "Arrangement information"on the menu Start. We desire to know the type of kick used by your motorcar, UEFI ou BIOS.
Make certain you accept the "BIOS mode" set "UEFI"as in the image beneath.
Knowing that at that place is a big difference between the "BIOS"which is used by older operating systems Windows 98 to Windows seven, and the UEFI which is used past Windows 8 / 8.1 / 10.
If yous accept the Mode in UEFI, this tutorial is for y'all and should piece of work correctly.
1. Create a recovery central in case ...
Windows allows you lot to create a recovery key, this key can assist you lot to recover the operating system in the event of a failure.
Files elsewhere in the folder documents/images/etc... will non be saved, they must be copied onto an external difficult drive.
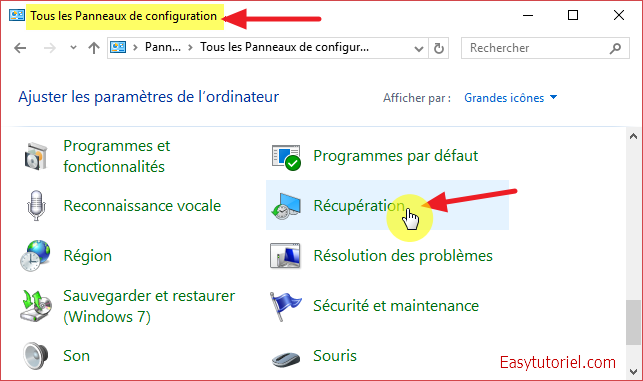
On the "Control panel", choose "View By: Big Icons"then click"Recovery".
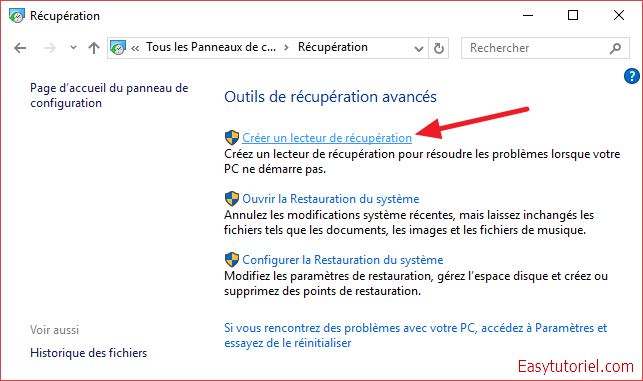
Then click on "Create a recovery drive".
Insert your USB key then let Windows copy the files correctly.
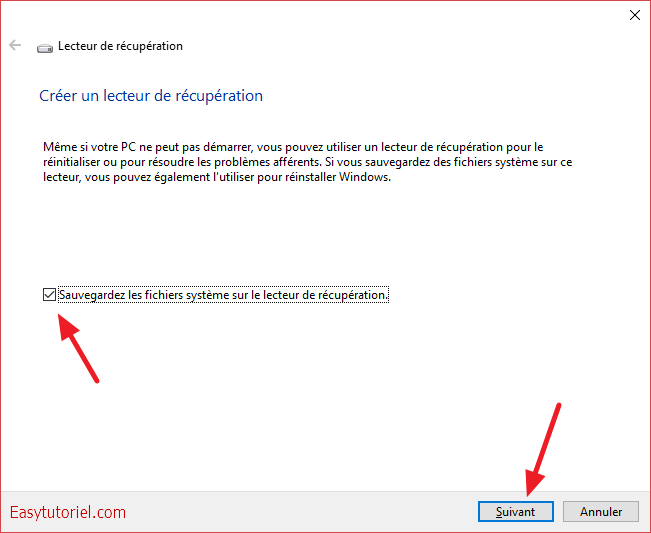
If you are unable to create a recovery USB drive, this is okay as long as y'all accept backed up your data and have an installation DVD. Windows in case of failure.
2. Preparation for booting.
Disable fast startup.
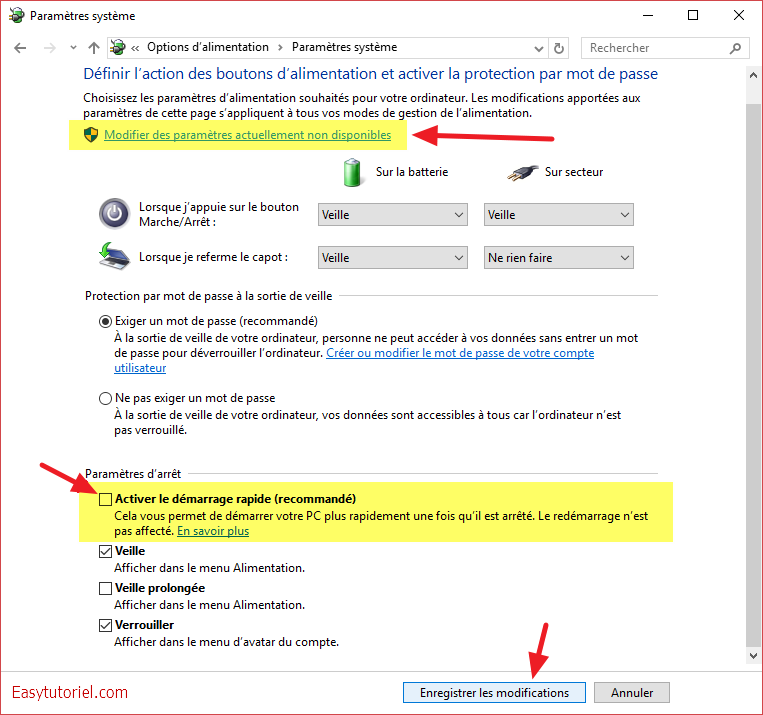
In order to ensure the smooth running of the installation yous must conciliate the fast start of Windows, open the "Control panel">"Ability Options"then click"Cull what the ability button does".
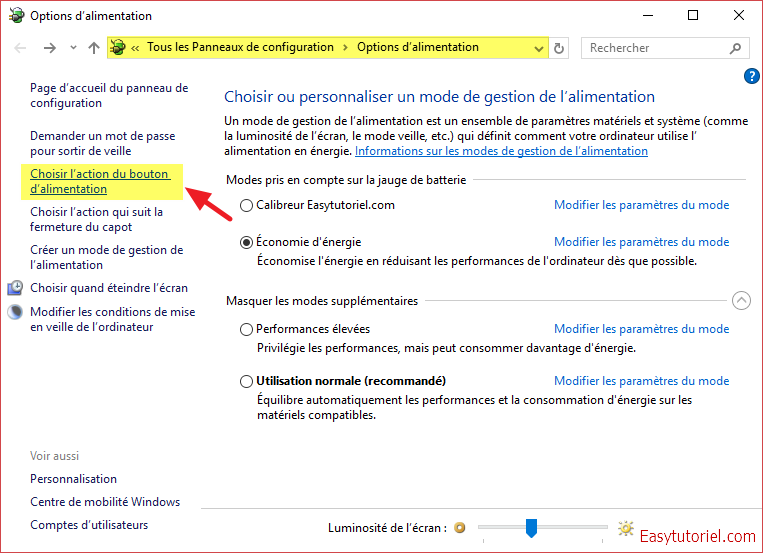
And so click on "Change currently unavailable settings"then uncheck in the shutdown settings"Enable fast startup (recommended)"to turn off fast startup.
And so click on "Salvage Changes"to save the new settings.
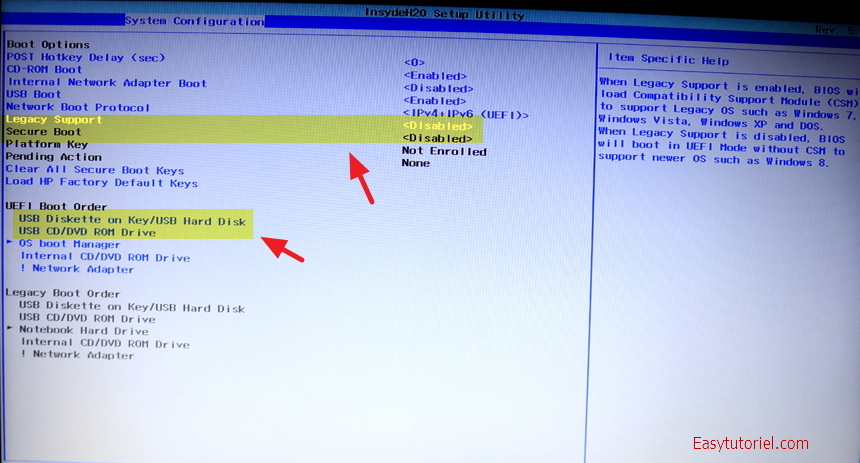
Disable the "secure boot" and activate the "UEFI" boot
On your BIOS, look in "Kick Options" the pick "Secure Kicking"and turn information technology off.
If you have the option to deactivate the old Boot (Legacy Kick), it is recommended to disable it just for this tutorial, y'all can re-enable it after if you lot desire to install Windows 7 egg Windows XP on a third partition later on.
The objective here is to force our BIOS to boot on UEFI only, which will make the installation of Ubuntu necessarily on UEFI and therefore walk equally it should.
One time that's done, permit'southward motion on to creating our Ubuntu USB drive.
3. Create an Ubuntu bootable fundamental (64bit).
Download your re-create of Ubuntu 15.1(or the latest version) via the official Ubuntu website: http://www.ubuntu.com/download/desktop
This tutorial also works with Ubuntu Desktop 14.04.4 LTS, and must also work with 32bit versions.
The ISO file I used in this tutorial I downloaded by torrent: http://releases.ubuntu.com/fifteen.10/ubuntu-fifteen.x-desktop-amd64.iso.torrent
We are going to apply the tool to create the USB key. Universal USB Installer which you can find here: https://world wide web.pendrivelinux.com/universal-usb-installer-easy-as-1-2-3/
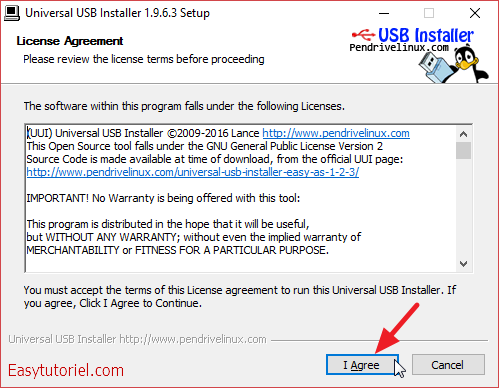
Once downloaded, the tool does not require installation; just do it ![]()
Click on "I Agree"or type ALT+A (that'south the role of the "_" below Agree)
In the list cull "Ubuntu", click on "KATEGORIEN"to import the ISO file.
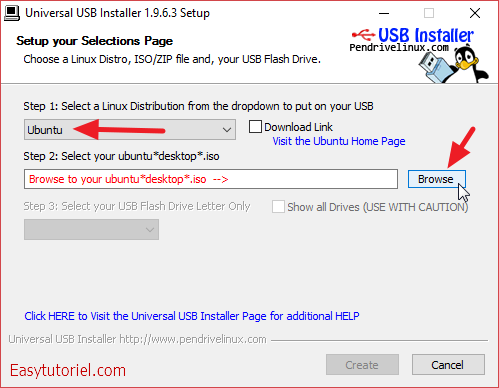
Select your ISO file and then click on "Open".
Note: When the file ends with an "i386.iso" information technology means that it is a 32bit system and if information technology ends with an "amd64.iso" it ways that information technology is a 64bit system.

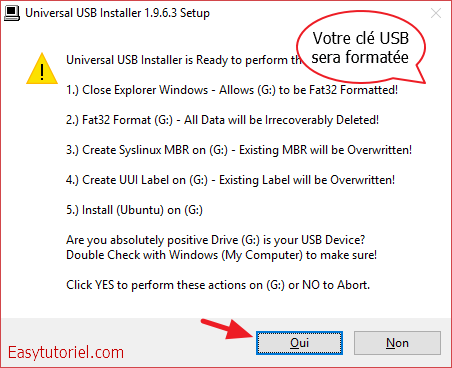
Choose your USB central and check "Drive format"then click"Create".
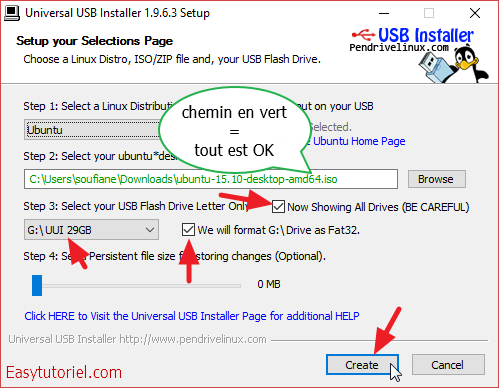
Your USB cardinal will be formatted completely, retrieve to back up your key data in a prophylactic location.
Click "Yep"to format the USB drive and create the bootable Ubuntu USB drive.
Subsequently a few minutes, your cardinal is ready for use.

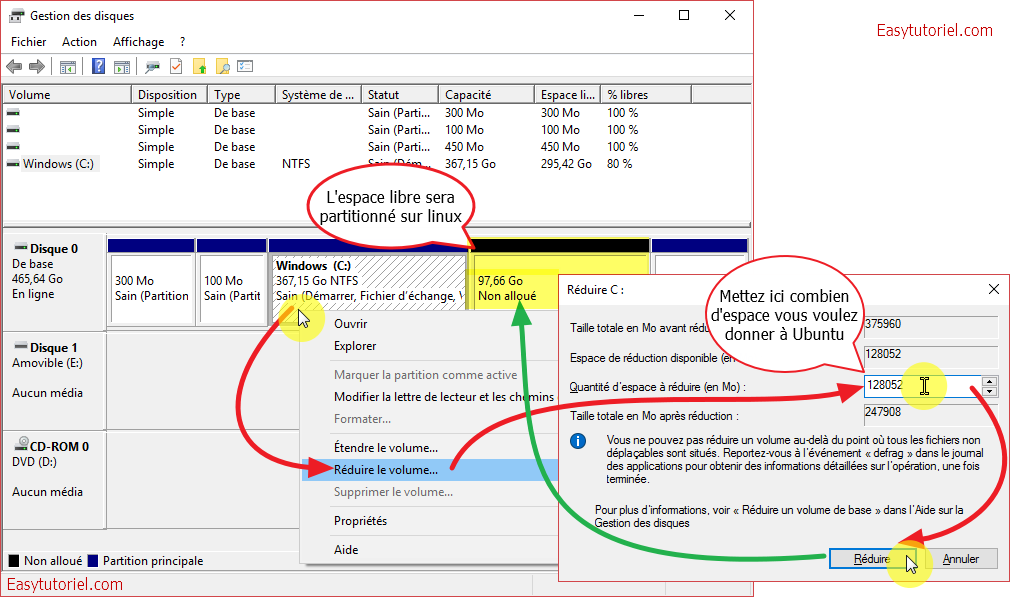
4. Create complimentary space for Ubuntu.
In order to install Ubuntu nosotros need to create space; to do this run the command diskmgmt.msc on the "Run" command window ( ![]() Win+R)
Win+R)

Follow these steps to create a free space (Unallocated) ;
- Select difficult drive
C:in the top part, - Correct click on the score de Windows then practice "Reduce volume ...",
- Wait for a few seconds to summate the space that you lot can reduce,
- Choose in MB (Mon) the size of the space that you want to classify for the Ubuntu partitioning,
- Click on "Lower",
- Don't create a partition, we'll create it through Linux.
v. Installation of Ubuntu.
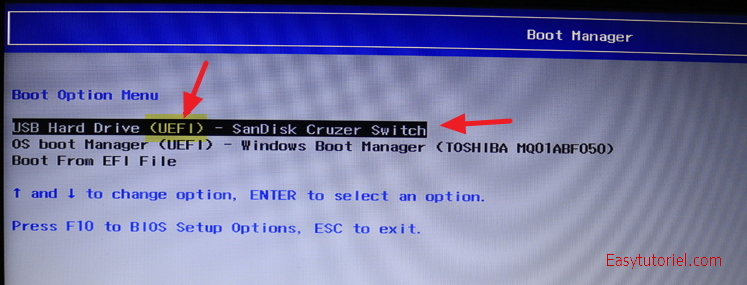
Reboot in Ubuntu LiveCD.
Insert your USB drive and printing one of the following keys to make certain to kick to your UEFI USB drive: F9,F2,F12,F10 ouESC.
Make sure that on the Boot card you have "UEFI"as starting style, employ the arrows ↑ et ↓ to choose your cardinal.
Later the appearance of a few lines of text, y'all will have your ubuntu live starting upwardly ![]()
Choose from the Grub carte "Endeavor Ubuntu without installing".
This will give you the possibility of using the browser while installing your Ubuntu organisation, very useful not to get lost; yous can for example (if y'all have a connection that works on Ubuntu Alive)follow this Ubuntu tutorial.

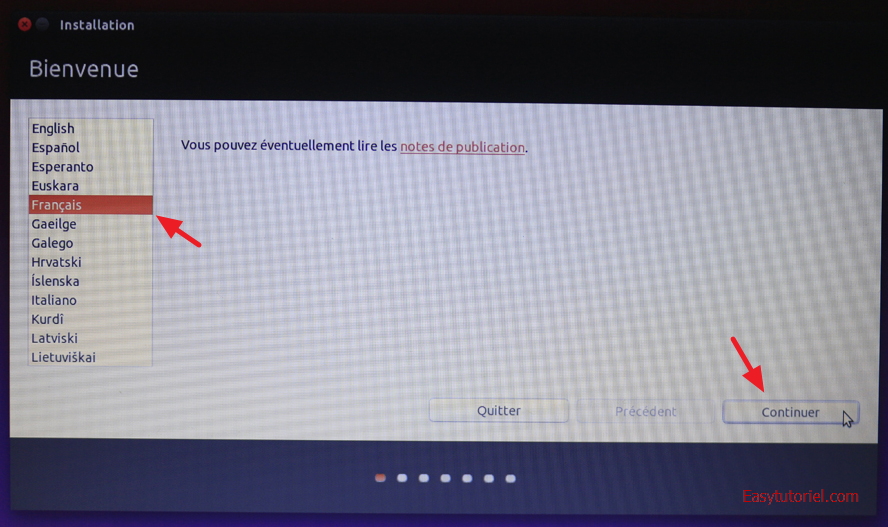
Start the installation of Ubuntu by clicking on "Install Ubuntu 15.10" in the office".

Cull as language "French"then click"Continue".
If your Internet connection works on Ubuntu, yous volition have the "✔ is connected to the internet".
You can therefore check the pick "Download updates during installation"to ensure that Ubuntu downloads and installs the missing drivers during installation.
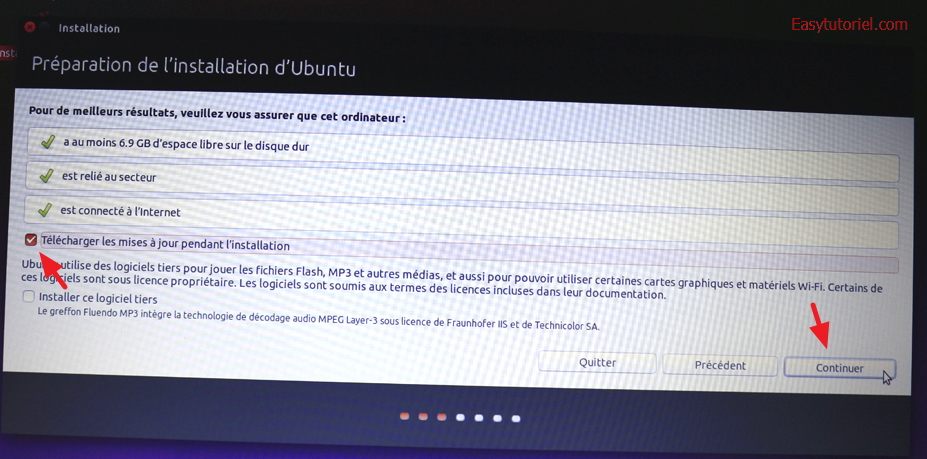
Click on "Go along"to go to the partitions stride.
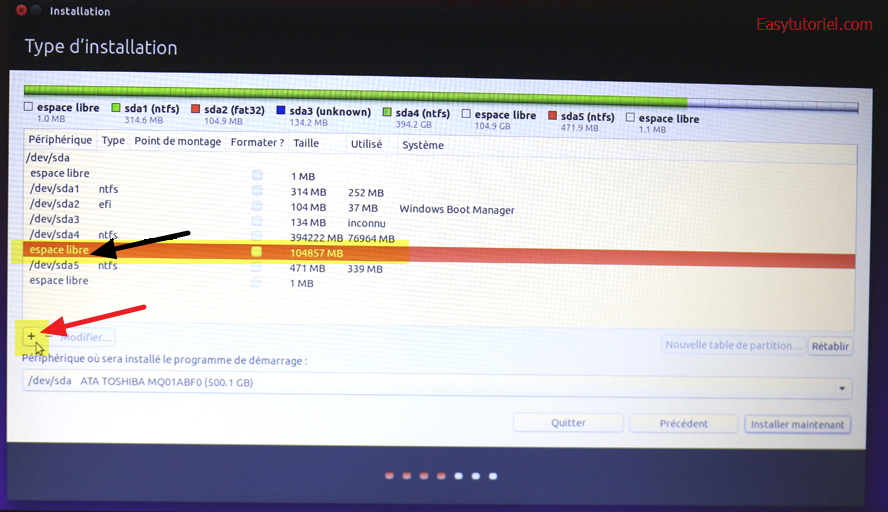
Creation of ext4 "/" and swap partitions.
Unlike Windows, on Linux (here Ubuntu) we use a different file system (ext4 instead of NTFS) and we use a swap partition to improve performance between hard drive and arrangement memory.
In this tutorial we are going to create Ii partitions, to keep things simple and piece of cake:
- Partition
ext4for root "/" - A bandy sectionalisation
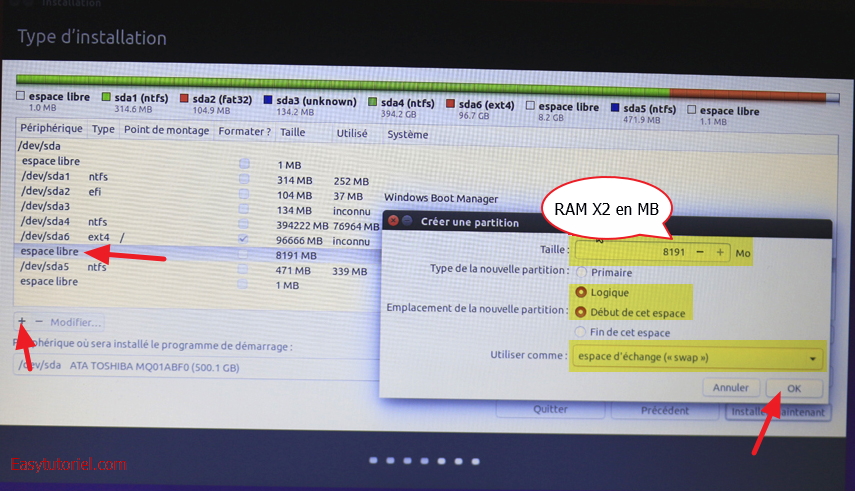
Let's start with the score "/" in ext4, select the free infinite you lot have simply created on Windows then click on the "+".
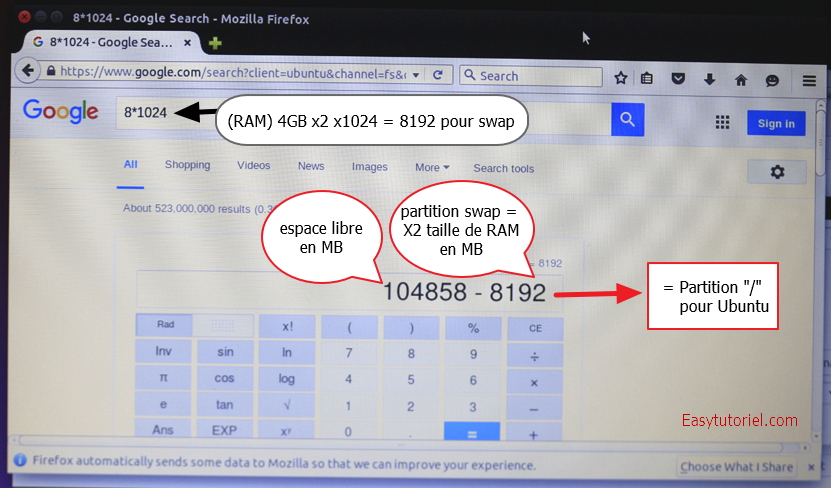
To know the size that we are going to allocate to the Ubuntu sectionalization, we demand a little math ![]()
Become out your calculator, or practice like me, use google.
Multiply the size of RAM installed on your machine by two then past 1024 to obtain the size of the Bandy segmentation: SWAP = TAILLE RAM X2 X1024
Subtract the gratuitous space from the size of the Bandy partitioning to get the size of the main "/" partition of Ubuntu: ROOT '/' = ESPACE LIBRE - SWAP
Put the size of the primary sectionalisation you got from subtracting into the example "Size", select"Logic"And"Showtime of this space", choose in"Mounting indicate=>/".
Click on "OK"to create the division of Ubuntu.
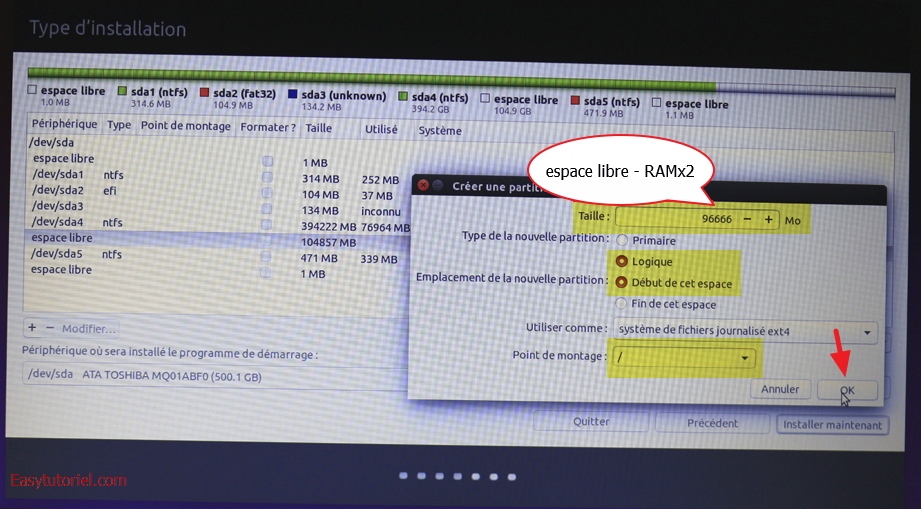
Select the free space a 2d time then add a division "bandy"with the residuum of the free infinite, you take already done the calculations, information technology must remain double the RAM size in MB.
Click on "OK"to create the swap partition.
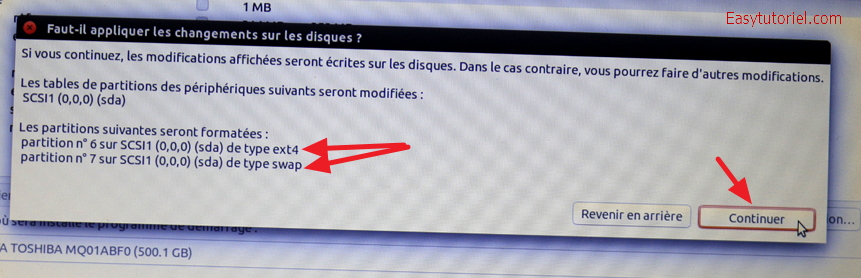
Click on "install now".
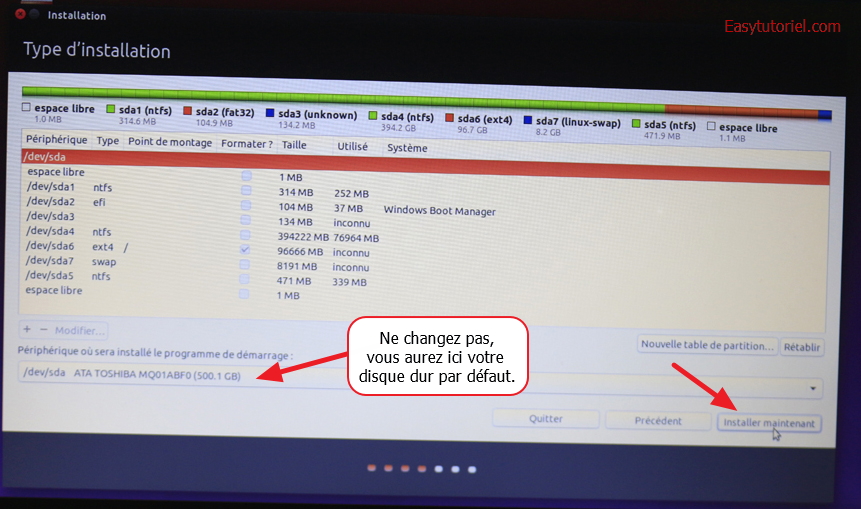
Click on "Go along". The partitions on the left (/ and bandy) volition exist formatted.
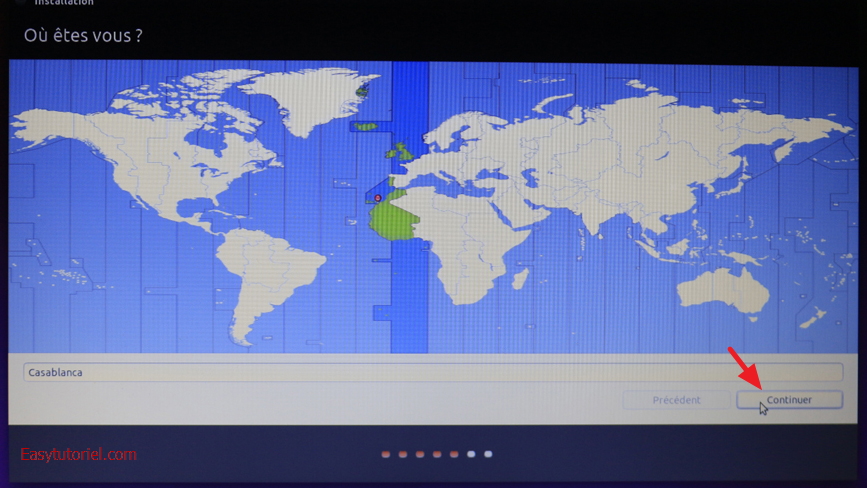
Cull a time zone then click "Continue".
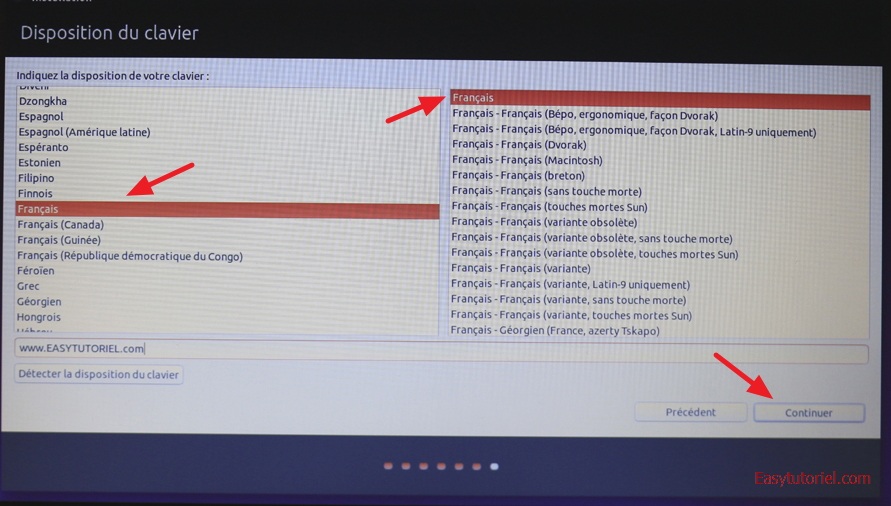
Select the keyboard language.
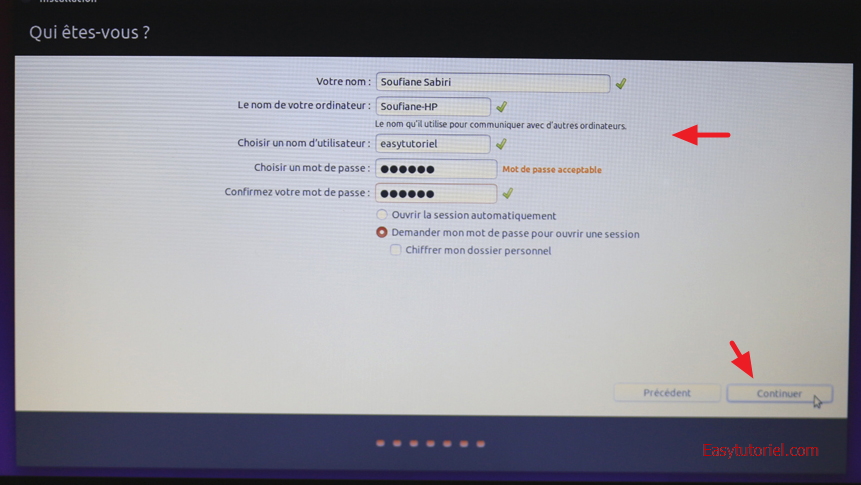
Enter a name, estimator proper noun, username and countersign.
Click on "Continue".
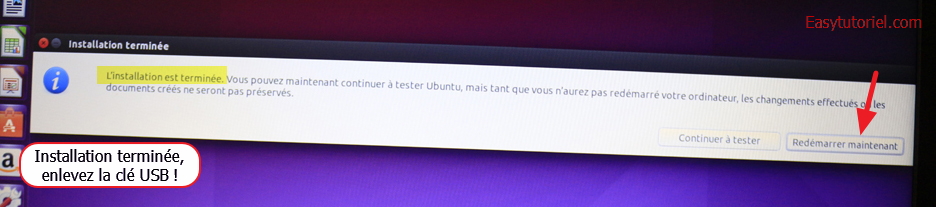
Look until the end of the installation, if this message appears click on "Restart at present"and remove your USB primal.
If Ubuntu does non appear in startup, or if the installation got stuck in formatting the ext4 partitioning, don't worry, I have the solution!
Read on.
Formatting problem?
If yous accept Ubuntu stuck in formatting ext4 partition, restart your computer and kick from the USB key a 2nd time.
Once Ubuntu is booted again on the Ubuntu bootable key, expect for the utility "gnome-disks" (Disks)
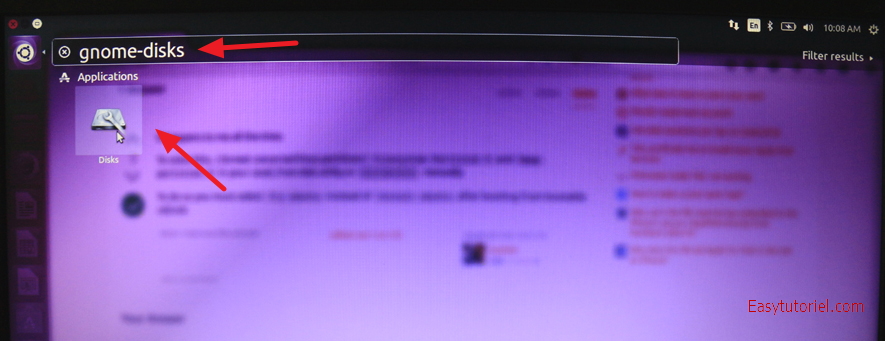
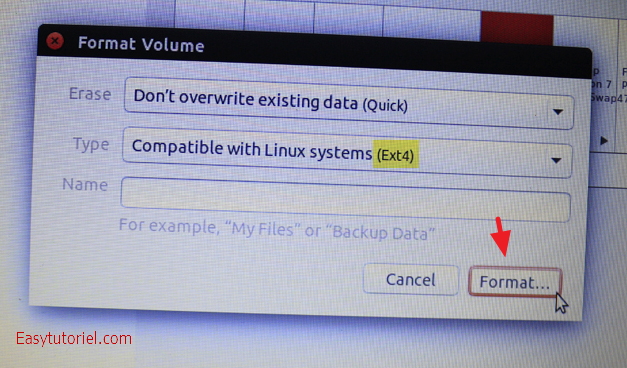
Select the segmentation Ex4, click on the gears and choose "Format Partition ...".
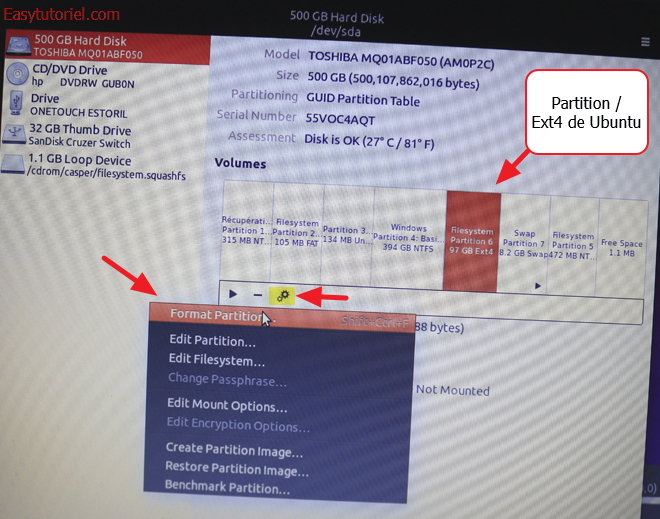
Validate the partition formatting Ext4 clicking on "Size".
RE-run the installation of Ubuntu, only in the part of scores, uncheck the "FORMAT" option in the list of the EXT4 partition.
This time the installation will not become stuck in formatting and you lot must have a working system!
If the installation is successfulas you have no choice between Ubuntu and Windows when the engine starts , go on reading.
Results !
This is what looks like Ubuntu 15.10 ![]()

Session login screen.

Force Windows to outset on Ubuntu:
Open the menu Start de Windows, Concur THE Cardinal MAJ AND CLICK ON "To restart", always agree the fundamental MAJ until a blue interface appears.
Choose the choice "Use a device".

You will find "Ubuntu", click on it!
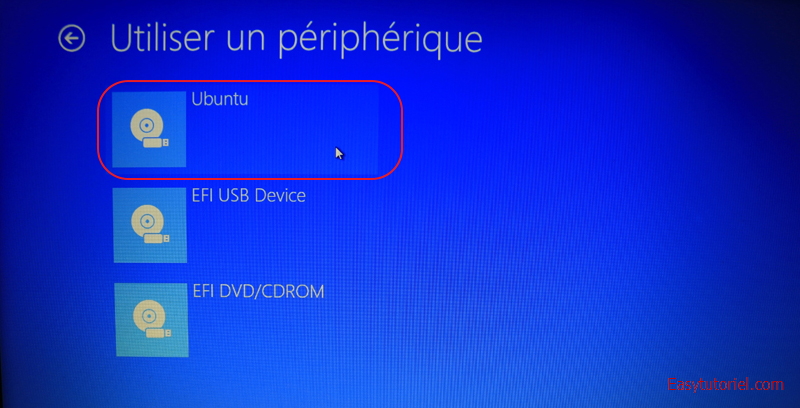
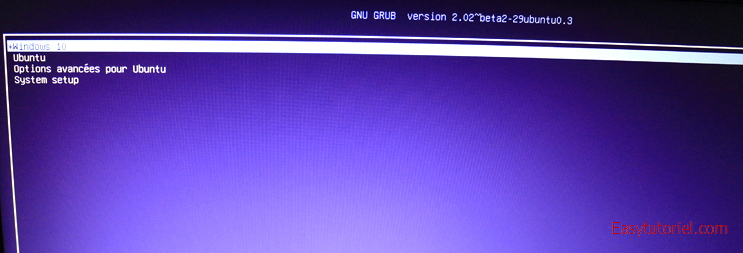
You will have admission to the menu GNU Grub from Ubuntu, choose Ubuntu to access your favorite Linux organization ![]()
Install additional drivers:
To install drivers, search for "Pilotes"in the Ubuntu search then click on"Boosted drivers".

In the tab "Additional drivers", choose "The employ of ..."then click on the install push button.
Ubuntu will download the drivers from the Internet and install them automatically ![]()

half dozen. Modify the kick social club.
Change the UEFI boot guild.
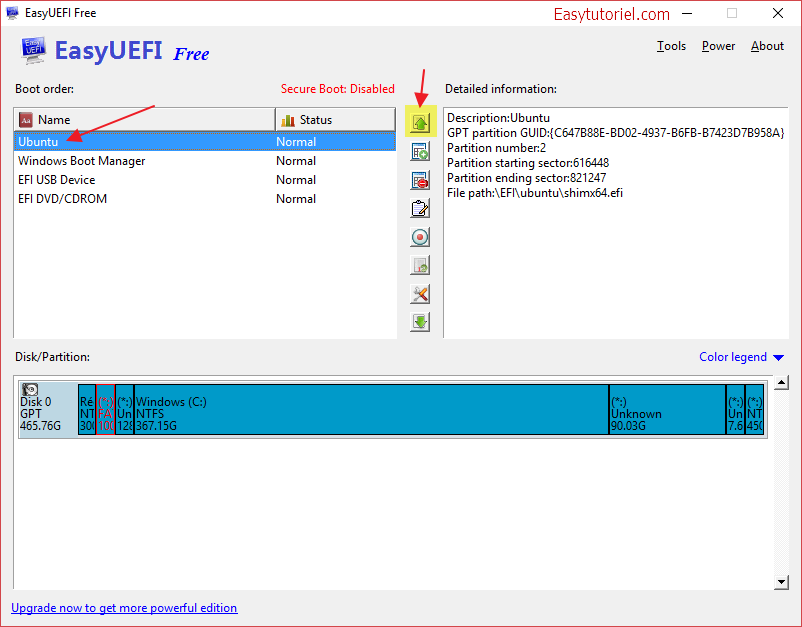
To display the elegant menu GRUB two instead of Boot Managing directorde Windows, install EasyUEFI on Windows by this link: http://www.easyuefi.com/index-us.html(click on Download Gratuitous)
Select Ubuntu and then press the arrow button to bring it up, and voila !
On Linux in that location is the following Trounce command to brandish the EFI boot list:
# sudo efibootmgr -v
To alter the social club employ the post-obit Vanquish command changing the order in the list with commas:
# sudo efibootmgr -o 0000,0002,0003,0001
Otherwise the use of EasyUEFI on Windows is sufficient.
Let'due south motion on to the change of the Chow menu on Ubuntu.
Change the Chow 2 boot order.
Here is the consequence to get, when I start my estimator I have this bill of fare with Windows 10 upward, information technology will start in 10 seconds on Windows if I don't do annihilation, at the same time, I accept the choice to offset on Ubuntu without having to worry.
On Ubuntu, open the final and run these commands to install Chow Customizer :
# sudo add-apt-repository ppa:danielrichter2007/grub-customizer # sudo apt-get update # sudo apt-get install grub-customizer
To launch Grub Customizer, apply this command:
# sudo grub-customizer

Right click on "Windows Kicking Manager" then "reappoint"and cull a cool proper name, similar"Windows 10".

So employ the arrows several times until you get the order yous want, you lot tin also remove modes merely this tin brand system repair impossible in case you need to access Recovery mode found in Advanced options for Ubuntu.

Restart your reckoner, you will have the pick between Windows and Linux, YAHOOOOO !!!
Et voila ![]()
You just installed Ubuntu 15.1 in dual with your Windows ![]()
If yous have questions I am e'er here to help you, do not hesitate to share this tutorial with your friends and relatives.
It was Soufiane de Easytutoriel.com, give thanks you for reading and run across y'all shortly!
Click here to comment.
Soufiane Sabiri - Easytutoriel.com
Source: https://www.easytutoriel.com/en/ubuntu-dual-boot-windows-uefi.html
Posted by: belandoringlats.blogspot.com
0 Response to "How To Remove Ubuntu From Dual Boot Windows 10 Uefi"
Post a Comment